Friday, May 07, 2010

Cardigans

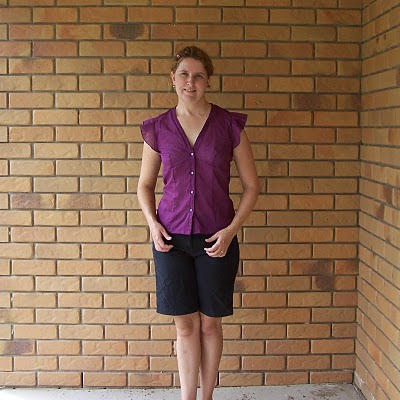
The other day I was in the mood to sew, but wanted something simple that wouldn’t require me to change colours on my overlocker. I was feeling lazy, nothing new. Anyway, I found this glittery silver grey knit and thought it would make a really cute cardigan. Now, I have had Kwik Sew 2759 in my pattern collection for a long time, I have even traced it in different sizes as I grew older and fatter. But I can’t recall having actually made it up. I love wearing cardigans with the SE QLD weather – autumn days means freezing in the morning and really warm during the day. Anyway, I chose view C, which as a binding around the neck and front edges. There are no buttons on my version, simply because of the laze factor and I usually don’t use the buttons anyhow.


I have had this knit top since I was pregnant with Scott. I actually used a Kwik Sew outerwear pattern but I used a lightweight wool-type jersey. This is a terrific green colour and I used a matching thread on my sewing machine, but I must have run out of ideas for a hem finish because I just left it as is. While I had my cardi pattern out, I thought I might as well reconstruct it into something that I can wear now. There was plenty of fabric to use, but not enough for a band. Not that I needed a band, as the pattern gives an option to finish with lingerie elastic, but I just like the look of the band more.
I left the sleeves a little fuller than the pattern, as it was already sewn up anyway. I did not have enough for long sleeves but I think the shorter sleeves suit the weight of the fabric anyway. I knew straight away that I would be using black picot elastic – that was the colour I had in my overlocker. I even found the elastic in my picot elastic stash. I haven’t used this colour before because I have only really used it for Jalisa (and therefore not in need of black yet).
I chose not to interface/add buttons. I rarely button my cardigans up and I just wanted a quick project. If I did it again, I would cut the sleeves with the right width. It is a little full and my coverstitch machine hates sewing picot edged hems in the round.

Yes, we do have a pink truck parked in our yard. I hate having it there - it makes up the bogans of the street. DH won't even park it behind the shed anymore because it got bogged. Anyway, I thought it might make a nice backdrop.

Saturday, May 01, 2010

Pink boucle coat for Jalisa

Jalisa chose a pink boucle fabric for her Winter Coat this year. Since it is not exactly a warm fabric, I interlined it with a cream flannelette. It is lined with a white and silver cotton. Pattern is from Ottobre
The fit is is okay - it will fit all her layers under it so that is the main thing.
This is a close up of the fabric and the buttons. These are the most expensive buttons I have ever used.


Thursday, April 15, 2010

Rainbow dress

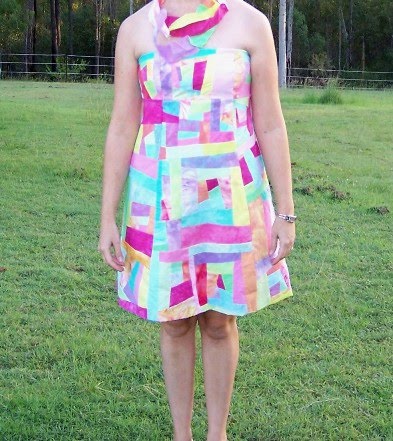
This is my entry for a wearable art category at the local show. I had so much fun making quilts last year that I thought it would be equally fun to make a crazy patchwork outfit.
Fabrics are hand dyed using various techniques (swirl dyed, low water immersion, dye bath). I cut the fabric into strips and sewed them together onto calico.
The pattern is Burda - a princess, A-line strapless dress. The ribbon is actually some stripped that I pinned together. It was windy and it was floating around. I think I want to sew a few of the left over together to make some type of scarf/drape as part of the entry.


I forgot to get a photo of the lining - it is hand dyed as well, a lovely shade of green.

Wednesday, April 14, 2010

Purple dress with applique

Okay, jumping the gun again because I still have 20cm or so of the lining to hand sew, but I don't care.

This dress started off as Burda WOF #107 from 12/04 - a princess-line, raglan sleeved evening gown that I thought would work for the creative piece that I had in mind As I sewed up the purple sateen (gorgeous fabric to work with BTW) I hit a snag. The dress looked terrible on me. It did not sit right and it was these wing things happening from the dart at the top of the sleeve (did not make how much I blended, and shaped and coaxed, the apex kept jutting off my arm and it looked terrible.

After having a big sulk about my wadder, and having a big whinge at DH who was just tryinng to enjoy the Easter weekend, I began to compare the pattern pieces with other Burda dresses that i have have traced. I discovered another dress was almost identical in the skirt, and I had enough fabric to recut another bodice.

This dress is going to be entered into a creative dressmaking category for the local show. It was a little ambitious seeing that I am not particularly arty or creative and I wasn't sure if dyeing was what they had in mind (exammples given include smocking and embroidery). I would have like to try reverse applique a la Alabama Chanin but that is better suited to stretch knits. I appliqued the flower with satin stitching.

Thursday, April 08, 2010

Sewing ADD

I had a mini tracing/cutting frenzy on Sunday. I had been meaning to trace some hoodies for Scott but always found something else to do. Anyway, here are some of the results.

This one is Kwik Sew for Toddlers (the newer version). I thought the grey marle needed a little jazzing up, so appliqued his name on the front in the same fabric.
This is an Ottobre hoodie ( #9 from 4/09). Has my fave curved raglan sleeves and is reversible. The pattern is meant as a top but I have used Polar fleece on one side so it is more of a jumper.

This is KSFT again, the jacket option. I lined the body but did not have enough fabric to do the hood. I still have to add the snaps and sew the hems shut, but I felt like snapping a picture anyway.
Here is Jalisa's coat. So far I have finished sewing the outer shell. I have to buy the lining fabric before I can progress. It has come along beautifully, as most Otto patterns do.
This is an inner shot, to see the flannelette interlining. The pattern has you press the seams to the centre and topstitch, but I have pressed them open to reduce bulk and topstitched on both sides of the seam. Hard for me to capture but the seams are nicely highlighted with doing it this way.

This is Jalisa trying it on. Good thing her face is not clear - she has jam all around her mouth. The sleeves are a little long but some of the length will be taken up with turning the sleeves in with the lining.
Here is another work in progress. This is my wearable art dress for the show. I only have to understitch the top seam and hem it. All the fabric is hand dyed. I am not sure how I feel about the results. It was supposed to be random and crazy but I am still not sure I got it close to right. I will still enter it at any rate - a lot of hours went into this baby. When it is completely finished, I will do a modelling shot. This is my first strapless dress and I actually don't mind wearing it.

Saturday, March 13, 2010

Whoops, I traced the pattern incorrectly and it is missing a zipper. Yay, it still fits (even if it is a tight squeeze to get on)

Whoops, there is a huge smudge on the camera lens. Yay, this is my own draft of a peasant to so that I don't need a zipper.

The only thing I have left on this blouse is the buttonholes and buttons. But the top is so unflattering. The sleeves are supposed to be puffy and they are, slightly. And the pleats make it look maternity. I am not happy with the collar style on me. The pattern itself looks fab. Maybe I can save it. I need help.
Yay - some undies that fit DD. Traced off a RTW pair, I added more height and the waist and bound the seams. They fits wonderfully well.

There is not picture of the whoops vintage style undies that could be mistaken for a parachute.

Sunday, February 28, 2010

Curved panel pants - with a tutorial

After cutting out a few pairs of too big pants for DS (still not sure what went wrong) I wanted to add a little something to my basic Ottobre pattern that I had sitting around. Enter the curved panel pants.

First trace your pattern. Draw a line were you want you it. Add seam allowance to both sides - I do it at 1cm since that is my regular seam allowance.


Now you have to trace off your new piecces.
Since the patterns include a seam allowance, they should not match up nicely (only on the stitching line). It is really important to draw the grain line on all pieces.
Cut out as normal
Sew up the panel seams. I don't pin - you can see how it doesn't look like it is matched up at the seam edge...
but you manipulate the fabric around as you sew for a smooth seam.
Make sure you clip the seam so that it will lie flat.

Sunday, February 21, 2010

Colouring in cord

For awhile I have been thinking about a dye technique that would be easy like low water immersion but with soft smooth variations in colour. The idea was tested first in my trusty kitty litter tray (reserved for dyeing, no cat in this household) and some plain paper. On Friday there was a break in the weather so it was time to test my idea in full scale.

For this method, I use my tray and mixing up the dye like I would the shaving cream method. However, I make up a huge amount of the dye /shaving cream mixture, pour it into the tray and move the tray to creat soft mixes of the colour. It was a steep learning curve, since the ground wasn't flat and I hadn't worked out what the right dye+ shaving cream+water ratio was best.
It was a windy day too so I couldn't spread out my fabrics flat. Above is my favourite one. Pity it is the smallest piece.


I needed to mix up some more dye here. Too many blank areas.
I made two other pieces but I think they will be redyed. The depth of colour is low and the contrast minimal.
What do you think?

Sunday, February 14, 2010

Pink and jade Burda for me

You know, I am pretty low maintenance. I am pretty economical with my words (spoken and written). This is pretty much reflected in my infrequent posts and minimal pictures. I love seeing ones with full make up, hair done and coordinating shoes. Not here. I feel pretty good that I have managed to take some photos (with the help of a tripod).

First up is a dress that I made last year. It is two Burda patterns morphed together. I like the shoulder area of one dress but did not like it's sleek, sheath skirt portion. So I traced another dress pattern with a flared princess lined skirt.

I was looking a little sack - like until I used the seams and took it in, lots.
I can't remember if I showed this blouse from last year. It is the same pattern as this top
I made it with a white stretch poplin. I chose to use the collar and lapel option and a flat sleeve. I can't get the lapel to sit down though - the lapel piece is quite thin and with the lapel/interfacing + seam + facing/interfacing, it is quite thick with fabric.
I am wearing a new skirt that I know I haven't blogged yet - I finished it yesterday. Pattern is Burda, actually the same skirt pattern as my January Meme
However, between each panel I have added a godet (you know, a triangle). So it is lovely and swishy.
See, I told you it was swishy. Fabric is a cotton voile - lovely fabric to sew with.

Thursday, February 11, 2010

Sewing reviews

This is some of the sewing that I completed last year before we went away on holidays. They have been worn a fair few times but each time I wouldn't have time to get a picture or the batteries were flat or some other lame excuse.

First up is my TNT Burda yoked a-line skirt. I really like this fabric but did not buy much of it. Maybe I was buying it for Jalisa. I would have liked a dress from it, but had to settled on the skirt.
This is a dress from Burda WOF (6/2005 #123). I wanted to try something different for a change. The fabric that I chose did not pair well with the pattern. Too many seams cutting up the pattern.

The pattern was easy and went well together. I had to let out the side seams a little to skim more over my hips. Next time I will flare out the skirt portion when I am cutting out to make it a more flattering A-line shape.

Eek, I did not realise I looked like that from the back.
Thanks for looking.