Showing posts with label Sewing. Show all posts

Sunday, June 15, 2014

Discos and sequins

My daughter had an invitation to a party and she needed an outfit with sequins. It was a disco party after all. We found the perfect fabric at Spotlight, a navy mesh covered in silver and navy sequins.

How hard could it be, I thought. It should take 30 minutes, maybe a little longer if I include cutting. I wanted a simple tank style dress, fully lined to hide all the threads. I used an Ottobre t-shirt pattern as the basis, lengthened and flared, added a back seam, omitted the sleeves. This is the dress I ended up with, but more than 4 hours later.

Apparently sewing over sequins is a big no no for my overlocker. It chucked a nana after 2cm of sewing, snapping the needle several times and letting it fly towards my eye. Only at that time did I recall thinking I had seen people unpicking sequins in the seam allowance. It took FOREVER to unpick all those suckers but my princess needed to wear something.


Sunday, October 13, 2013

A few projects to share

I have packed this post with all the projects I have sewn lately. I have really lost the sewing and blogging mojo. Can you believe I had two weeks holiday and only sewed 2 projects (4 if you could the things the kids sewed). Am I the only person who doesn't sew when they are stressed. I tend to vege out and sleep instead.
 
First up is a maxi skirt in the peacock knit I purchased back in August. My goal was to sew everything before next year's sale. So far - 1m! The pattern is based on Kwik Sew 3032 - I just lengthened it and added slits to each side. These are super comfy and perfect for work. Not sure why this is only my third make using this pattern.
 

Next up is some PJs from a Burda magazine. The pattern number is 128 from 12/2008. I intended to make the nightie but did not quite purchase enough fabric. I love the colours in these PJs - reminds me of a holiday or something. I had to redo the elastic in the back so that it sits snug against my back. As you can see, the top is loose compared to the shorts - I am actually a size smaller on the top. I used the Burda boxer shorts pattern but had to make it a little bigger than my normal size. It is pretty tight as it is so next time I will probably go back to my regular pattern from Kwik Sew. The fabric is actually a seersucker. I normally wear knit top PJs in Summer, so will see how I go.
 The next pattern is Burda magazine 111 from 09/2007 
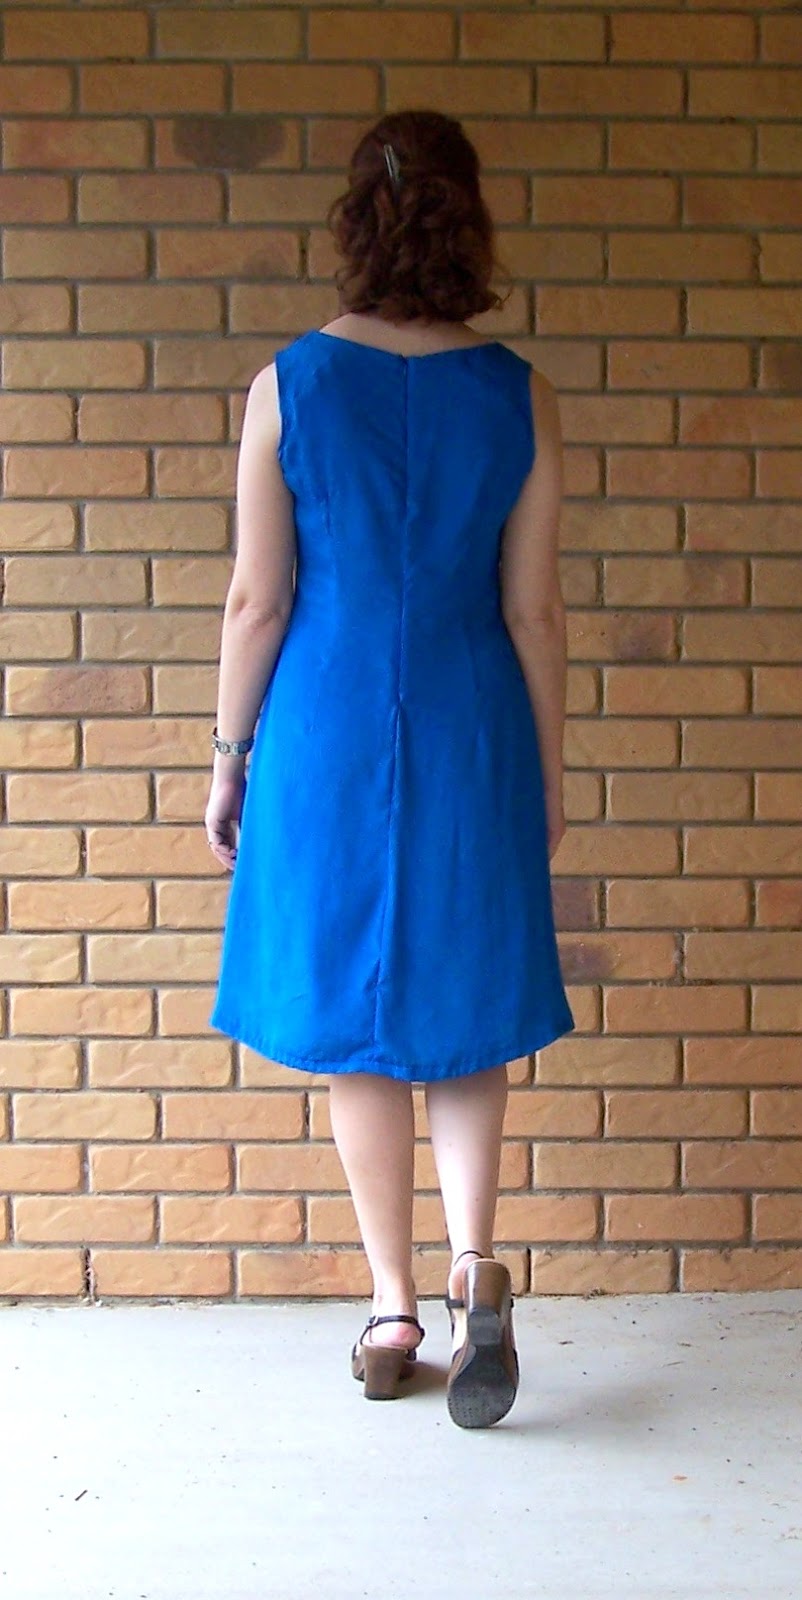
again, but this time with a slightly altered neck. This dress was intended to be a weekend at home type dress because I did not have enough fabric to match the pattern, but I actually don't mind wearing it out. I think I was drawn to the lovely blues in this fabric, as I actually dislike the print.
 When I made this, I was slightly disappointed because it was sitting around the waist. I had put on a little weight around my thighs and butt and it was pushing the dress upwards. It is hard to tell but it is not really following the curve of my back either, something I will need to address in the future.

 My next dress is a Frankenpattern of 2 new to me patterns. The bodice is from dress 101 02/2011 Burdastyle magazine and the skirt is from dress 107 11/2007 Burda magazine. I loved the neckline and the cut on sleeves of the first dress but did not want a gathered skirt.
When I made a muslin of the bodice, I deemed that it was not too low cut for work and kept the neckline as it was. However, with the addition of the weight of the skirt, I feel it is a tad too low. I did staystitch the neckline, but it gapes at the front.
 The fabric is a stretch sateen print that I picked up at Spotlight on the sales table. I bought the end of the roll (2.25m) but found was enough to work with. I found the bodice was too wide when sewn up, unlike my muslin which was tight. Must be the stretch of the fabric. I took in 2cm from each side s a quick fix.
 I edgestitched the tops of the pleats down. I wanted soft pleats but thought it needed a little more structure at the top where it meets the seam.

 
 I am going to make this dress or a form of the dress again. This is really my style of dress. Although I realised that I would never wear this style to work  like I intended. I just feel too dressed up! I think I will stick to knit dresses - just waiting for my Red Velvet to arrive.
 Jalisa needs some new shorts and skirts so I made  her a pair of skorts. I have drafted these myself before so I was pleased that I remembered what I did last time. I made just one pair to see that they looked right. I intend to make a few more now that I know it fits right.
 Skorts are great for my girl. She is active but likes skirts and prefers knits. Her last lot have been in constant rotation and have lasted for years but it was time for new ones. (Goodness, I made the last lot in around 2009/2010)
 Finally, my kids have been wanting to sew more and I thought shorts would be a good project. We were going to sew cushions but they painted the fabric and it became really hard, so it was scraped for these. I think they turned out really well. Both shorts are based on the Bert pattern from Ottobre pattern 03/2009. I extended at the top to have a cut on elastic casing, and morphed the two back pieces and just left off the pockets. They both wore them yesterday, which was cute.


Tuesday, August 20, 2013

Kwik Sew 3472 - another green knit dress

There are some really cute Lady Skater dresses out there in the blog world. I was going to give the pattern a go when I saw the line drawing and recalled a Kwik Sew pattern that has been in my pattern stash for years. I can't even recall when I bought this it was that long ago.
 
 
Kwik Sew 3472 has two views. View A is a turtleneck, long sleeved, longer skirt version. I made view B, the half sleeved, shorter skirt with the jewel neck. Obviously you can mix up the views as you like.

I used a rayon elastane knit which my coverstitch hated. I actually had to sew strips of fabric to beef up the sleeve hemlines, so that it would not skip the stitches. I actually left the hem raw because I did not want to have the same problem with the hem.


Below is how the pattern sewed up. What a let down. the pattern is described as having a drop waist, but it was not was I was envisioning.
 
I sought feedback from the ladies over at the Crafty Mamas Forum who suggested taking in the side seams as well raising the waist seam and taking up the hem. Well, first I chopped 10cm off the bottom hem before deciding to bite the bullet and cut the waist seam out, shorten the bodice, reduce the width and reattach the skirt. Hardly rocket science, I just prefer to unpick and keep the integrity of the pattern as much as possible. The side seams of the skirt had to be fudged to match up with the smaller bodice piece.

 
I will be transferring the changes to the pattern for next time though, it ended up being a great little dress for work althought it was a little windy today. This is how I wore it to work.


Tuesday, August 13, 2013

Vogue 1194 in emerald knit

In a quest to try new things, I bought a couple of $5 patterns in a certain Australian chain craft store. I think I bought 3 of the Vogue designer ones, since they are so exxy. I have admired many knit dresses across many blogs, so I picked up a couple with some interesting details.
This is Vogue 1194, which has gathers and pleats on the bodice, pleats at the front skirt, gathering at the back skir and a twisted front band. Hmm, I am just studying the desription on the back of the pattern and the pattern describes the bodice as being loose fitting. That makes me feel better. When I tried it on, the wedding dress fitting scene from The Proposal movie came into my head. It is a little looser that I would normally go for, but it is not too bad (I don't think).

 I roughly compared my basic tee pattern to the bodice patterns and I decided to trace a size smaller than indicated on the pattern. If I made it again, I would have to do something about the bodice front, as it fits great everywhere else. I am actually thinking about adding a plain top and using the pleated/gathered skirt for next time.

I really love the twisted front band - the pattern says to match notches but unless I traced the wrong ones, I could not match the notches without it being in the wrong place. I just made sure that the front and back bands met at the side seam.
Green is my favourite colour and apart from this in a very similar fabric, I don't have many other green garments. I do have some other green fabrics, including a very recent fabric purchase, so maybe I should change that soon.

It has been very spring-like weather here the last few days. It has made me think of spring sewing, which I hope to include some more dresses.  As long as the skirt is fairly full and has some type of shoulder coverage, I plan to wear more dresses to work. I have been in a real pants/shorts for work rut and I just need to have more fun with my clothes.

Having said that, I do have plans to make some shorts from the yellow linen I bought recently, inspired by Carolyn and Bernice. And a white blouse.

Monday, August 12, 2013

Simplicity 1802

 
I rarely buy patterns from the larger companies. I actually find the pattern books overwhelming and just have to walk away. I bought this pattern after seeing Sew Brusnwick's wonderful version. This dress was actually completed in May, but I was only finished it the night before I had to hand it into the local show so never had time to do get decent photos. For some years now, I have been entering a competition held through the local show, with the finals held at the Ekka (Brisbane Show). The judging at the Ekka was held on Saturday, and I am pleased to have placed Second in the Adult Daywear.
 
 
 I actually hadn't planned to enter this year. However, the steward phoned me and asked me whether I was planning to put something in this year, so at the last minute (with less than a fortnight to go), I started planning my entry. I was drawn to the piping and the rounded godets in this pattern. I was really hoping to find a black, white and one other colour cotton print to use for the dress, and I found this print at the local fabric shop.

At the time when I bought it, I did not realise how sheer it was and I had to go back to the shop to buy some fabric to underline it. By this stage, I had 5 days until the dress had to be in, and all I had was fabric. I cleared my weekend (and DH cleared the house of children). I was hoping for a smooth ride but ended up with a lot more challenges.
I muslined the bodice and decided I would make it in a size 10, a size or two less than the size my measurements should have been. I had read there was plenty of ease but I ahd my fingers crossed that the skirt had enough ease for my pear shape. I made a trip to the fabric store to buy rat's tail and piping cord for the piping. I bought I few different widths to experiement with. To be honest, I can't even remember what I went with. It was black and with the ribbons if that helps. It was not piping cord though. I had to make another trip to the fabric store to buy more since I had not bought nearly enough (I was not piping the godets, so had to estimate what I needed - I was off my a lot!). This is the first time making piping, so I am glad the seams were straight. I can't remember but I think it was from the Cherub's Kiss blog or maybe a tip L from Cherub's Kiss put on a sewing forum, but it was useful. You sew the piping to one side of the fabric right next to the piping cord, then stitch along the stitch line when sewing the other side of the fabric. Perfect piping. Well, it is a little lumpy at the neckline since I found I did not remove enough of the ends of the cord. Lesson learnt for next time. That was just amatuer hour from me.

The dress has a small zipper inserted into the side seam. I found the was not adequate and just could not get the dress on. I had no idea what to do, since the side seam finishes at the waist. I seriously considered binning the dress at this point. I could not wear it. After some frustrated crying and discussion with my husband, I went to see if I had enough fabric and underlining to cut a half godet plus seam allowance. I cut the other half godet from the original godet. I had to buy another zipper but I could choose a long one that would make it easy for me to fit into without too much trouble. I actually did not have enough underlining, I had to use the original underlining cut int half and not have a seam allowance. I finished the edge with the overlocker and you couldn't really tell when the side seam was folded back.


the zipper was probably the most shoddy I have put in, ever. It is not invisible but at least I can do the dress up past the piping/thick seams. The hem is finished with purchased bias binding. I  had just enough from the 5m packet. The hem is invisible as the slip stithes are attached to the underlining. I sewed the dress across a weekend and hemmed it over three nights. A lot of work went into this sucker and time does heal my pride, which was hurt over this dress. Not my greatest work but the competition is about the impact of the design as well the the workmanship. I promised the competition coordinator that I would be entering next year, I just need to start a little earlier I think.

Sunday, December 23, 2012

Sparkling new dress

I wanted to sew a new dress to wear out to dinner while we are on holidays. Every year DH’s family and my parents, who are mostly all down the coast holidaying, go out to dinner the night before New Year’s Eve.


I had bought this gorgeous blue fabric online intending to make Burda 05-2008-115, which is a flared sheath dress with a twist front. When the fabric arrived, the width was a lot narrower that I had thought (107cm wide) and I did not think I had enough for that particular pattern. Well, I sure did not feel like tracing a pattern to check out whether there was enough. Cue getting out the patterns and searching for something different.
 
In my mind, I wanted something fitted through the bodice and flared in the skirt. The fabric was thin and drapey but I only had 2.5m of it. I remembered about a pattern I had already used, the bodice of 107 with the skirt of 116 from the 05/2009 Burda. Being lazy, it was lovely being able to see that I had enough fabric without tracing a new pattern. The only other change I wanted was to ditch the sleeves. After trying on the dress that I had previously made, I saw that it would be easy to change the sleeve pattern.


The fabric is a linen/cotton/lurex blend. It is quite silky and likes to misbehaves. You know, you look at it and it crushes...or stretches out of shape. Even with stabilising interfacing tape, the fabric near the zipper looks puckered. And I am not talking about the hem (which seems much longer in the back but fine when I look in the mirror.) But is it such a delightful colour and the perfect fabric for high summer.


In hindsight, I would have bound the entire armhole rather than lining the “sleeve” and sewing the rest of the armhole seam with bias. It would have created a cleaner finish. And if I would do it again, I would have chosen a slightly thicker fabric without a mind of its own.

 
Here is how I did the sleeve alteration. First I pinned the pattern together.
 

Then I eyeballed where I thought the armcyce should go, using the rest of the armcyce as a basis.

 
 Trace a new pattern and see how it looks.


Monday, December 03, 2012

A typical day at school


A typical day at work during the summer is me wearing a pair of Jalie 2909 with a light cotton top or tee. I like the pants cut to knee level. This is my latest pair, in a navy bengaline. I can't think of anything navy that I have sewn, probably because I had a navy uniform at school. I am not so troubled by navy at the moment, and these might actually go with the new staff polo shirt as well. 
 
We were playing hangman as a lead in to the book I was about to read. I think I have played hangman twice this year, I record for me! And yes, that is a blackboard. The school has invested in interactive whiteboards (and I have an interactive screen in this spare room) but sadly, I pretty much get chalk dust on me everytime I work. There are only so many things you can show on the interactive screen.

Monday, November 05, 2012

I need a hero

 
As I was thinking about writing this post, I had a song running through my head. A quick search and I realised it was from one of the shrek movies.
 
Isn't the fabric for the shirt super cute? I originally purchased it from the crafty mamas store but I do believe it would be found at the sister site. Well, having said that, I can only see another colourway now. The pattern is an old fave, Ottobre #21 from 2/2005.


Monday, July 30, 2012

Ottobre singlets

I felt a little bad yesterday when my daughter told me the only singlets that kept her warm were the two longer ones. She has had the other ones for quite a few years and because they fit width wise, I thought they were fine.

Rather than procrastinate, I whipped out my Ottobres and traced, raided my remnents, cut and sewed these singlets for her. The pattern is #33 from issue 4/04.

I have made these singlets many times before but since it has been awhile and I thought that the length of the bindings would not be as bad as I remembered. The bindings, im my opinion, are way too short and need to be a few cm longer.

The white singlets will be dyed at some stage, when it warms up a little more during the day.

Friday, June 15, 2012

The 60s style coat - part 2: the one with the confession

I had also planned to use the lining material for the under collar but then because the lining fabric is so thin and fragile and a pastel colour that a different fabric would be more suitable. The idea about using the lining was to tackle the bulk/turn of cloth issue, so I needed a thin-ish fabric. Lucky I have a stash because I found a black herringbone weave wool blend that was perfect. Hopefully I have enough to still  use that wool for its intended use (pants) otherwise I might have to see if there is more at my local fabric store.  For turn of cloth, I removed about 1.2mm from the outer edge of the collar and 6mm from the edge that adjoins the collarband. The undercollar sits under nicely now that I have stitched-in-the-ditch around the collar/collarband seam. That seemed to stop it from puffing out and showing.

 
Since my sewing machine would not sew buttonholes through two layers of my thick boiled wool, I decided bound buttonholes would be the way to go. I did an average job on the front using Gertie’s windowpane method but made a right mess on the back. I got freaked out again and had the “bright idea” of cutting holes straight into the fabric and not doing proper window method with the square of fabric. Umm, bad move. Not only did the fabric want to stretch out of place, it wasn’t in the right position after all so I had to make the holes even longer. I nearly cried at my stupidity but managed to make it a little more presentable when I stitched the facing to the backs of the buttonholes. I really need to practice how to do the marking for the windows on the facing or try a different method or something because this is the second time I have had the experience of them not lining up.  I am thinking of doing bound buttons on my next blouse or skirt project so I can practice this skill. I think I also need to invest in some silk organza. Does anyone is Australia know of a good source?


I also had some difficulty attaching the lining. The fabric shell seems a lot longer than the lining. I attributed this to the boiled wool having more give than the lining. I had to ease the wool into the lining at times, but it all lots extremely smooth. I managed to rip a thin hole along the seam line when I was impatient with the unpicking, but I darned that area and sewed around it. Hopefully it will not be too fragile at this point.
For the hems and sleeves, I stitched in the ditch to tack the hems down, as well as some a couple of stitches here and there to stop the wool from moving. Since it was a knit, it likes to stretch.
The coat has managed to come together despite some difficulties. I experienced more drama than any other sewing project but I will wear it and that is all that matters to me at the moment.


Saturday, June 09, 2012

The 60s style coat - part 1

This project turned into a mojo killer. Perhaps it was the uninspiring colour. Maybe it was because I was so unorganised with the lining, buttons and notions that more than once I had to stop to purchase interfacing or buttons.  I know that it was a bigger project than I had anticipated. I forgot how time consuming coats/jackets can be. Sew some seams, stop and press those seams. Press the stitching, press it open on the inside, press it open on the outside. I would have to turn the iron on each time, as I don’t trust myself to remember to turn it off before I leave the house. The chances of a fire are slim, but I don’t like the idea of leaving appliances like that on.

The pattern is Burda 111-09-05. I have used before in a boucle.  It was a close call between that and pattern120-12-08 . On my list were pockets, collar with not lapels, set in sleeves and about 65cm in length. Each pattern has a few features from my list. I did consider morphing the patterns, and layed the traced pattern over the other coat’s pattern sheet but then laziness set in and I just decided to extend the older pattern and had the pockets from the other pattern. I decided I could live with the raglan sleeves and besides, they are way easier to sew in!
I lengthened the pattern by 10cm, as this is what I felt my boucle version was short by. I was going to sew the pockets in the lining fabric to reduce bulk, but then I remembered my current coat which has self fabric for the pockets and it is snugly warm to shove my fingers in on playground duty. The fabric I used is boiled wool. I thought I was ordering something pants weight and I don’t know whether the fault was mine or the ebay sellers but this has been sitting in my stash waiting to be sewn for a couple of years. I have discovered that boiled wool is perfect for in light showers, as the day we visted Cooly Rocks On to see the hot rods, there was numerous showers and the water stayed on top of the coat.

I will add some more detailed shots for part 2.

Sunday, May 13, 2012

A shirt for my boy - Kwik Sew 1190

I have been sewing a fair bit for my daughter lately. I never got around to blogging them, but she has had a few pairs of leggings and some dresses made for her. Anyway, the boy needed a good shirt or two and he was finally big enough to try out the vintage Kwik Sew shirt pattern I had picked up when he was young from the op-shop. Back when the op-shops around town actually sold patterns and buttons and other sewing bits and pieces. Now many of those op shops have closed or culled their craft section.

 This pattern features a seperate collar and collar stand, a front placket, back pleat, yoke at shoulder and cuffs complete with sleeve slit. Usually I would lean toward using an Ottobre pattern but Otto just doesn't seem to do shirts properly. This pattern uses 6mm seams, with 3mm seams at the slit. The fabric is actually a brown and white striped  winter weight cotton fabric.
When I finished this the other week, I was glad to see the end of it. It really was not my best sewing - I made a heap of mistakes. The process  for the slits  (sew facing piece with 3mm seams, then flip and topstich the other side) ended up showing the unfinished edge. It would have worked had this seam been 6mm, but 3mm was just to little to work with. I however only noticed after I had attached the cuffs. My remedy was to zigzag the edges. Luckily you don't really notice when the cuffs are closed up.

The other big boo boo was sewing the button hole to the wrong side of the cuff - I had even cut it open and everything. Once again you can't see it when the cuff is closed but seriously,  it was not a good sewing day.

I love love love this pattern and will make it up again, if only for the proper collar and placket. No doubt I will follow Sherry's sleeve slit method  next time and while this may result in having to change the cuff length, I would rather that then the exposed seams that I experienced.